One of the difficulties in monitoring a java process using JMX/RMI is the random secondary port opened for the JMX RMI connection objects. This random port can change every time the process is started, and there is no way to configure a firewall to allow this dynamic port to pass through. Fortunately there are some techniques for monitoring a java process through a firewall. These techniques will use a custom agent that will serve data on a fixed port number. Here is a solution for general java applications and for Tomcat 6 there is an easy to use solution.
To begin, we will first setup the Tomcat server and make changes to Tomcat, the firewall, and Java’s JMX security. Following the steps provided in Gabe Nell’s blog, the first thing you want to do is download catalina-jmx-remote.jar and place it in the lib folder of your Tomcat installation. Next edit server.xml and add
<Listener className="org.apache.catalina.mbeans.JmxRemoteLifecycleListener" rmiRegistryPortPlatform="10001" rmiServerPortPlatform="10002"/>
Feel free to use any port besides 10001 and 10002. Next update iptables to allow TCP connections for the two ports. Now on to the issue of security. So far I have not been able to use SSL connections with the Zenoss JMX monitor, so unfortunatly SSL is not an option. I was able to use password authentication, which takes a few more steps to configure. So to get going with password security, change directory to your JRE_HOME/lib/management directory. Copy jmxremote.password.template to jmxremote.password. Edit the file jmxremote.access and add a new role with the readonly access type.
For example:
myZenossRole readonly
You could use the existing monitorRole that is already defined, however that would make things easier to hack if a common role name is used. And just because, comment out the monitorRole and controlRole in the jmxremote.access file. Now edit the jmxremote.password file and add the role name you have created and enter a password for this role.
Following this, you will need to add a few commands to the Tomcat startup script.
-Dcom.sun.management.jmxremote -Dcom.sun.management.jmxremote.ssl=false
-Dcom.sun.management.jmxremote.authenticate=true
On one of the servers where I made changes, I ran into errors and Tomcat would not start up. Checking the Tomcat logs I found that Java could not find the jmxremot.access file. To fix this, I added the following commands to the startup script:
-Dcom.sun.management.jmxremote.access.file=/lib/management/jmxremote.access
-Dcom.sun.management.jmxremote.password.file=/lib/management/jmxremote.password
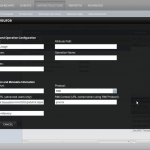
Zenoss configuration – To monitor Tomcat with Zenoss, you will need the ZenJMX collector which is part of the zenoss-core-zenpacks. For my CentOS 5 installation, I downloaded and installed zenoss-core-zenpacks-3.0.2.el5.x86_64.rpm. Next, make sure you have the Java JRE installed as this is required by the ZenJMX collector. Next you may need to enable the ZenJMX monitor, so click on ADVANCED followed by daemons. At the bottom of the list you should see the zenjmx daemon, so make sure the state icon is a green color. If you need to start the daemon or restart the daemon, the buttons on the right will take care of this. Also there is a link for logs, and this can be helpful if you run into problems with the ZenJMX collector. Next you should bind the ZenJMX template to the device which is running Tomcat. If you do not have a device configured yet in Zenoss, please do so at this point (not covered by this article!). Browse to the device in Zenoss and choose the Bind Template action (small middle button on bottom left). Select the ZenJMX template it it will now appear in the tree panel on the left of the screen. Click on ZenJMX in the tree panel and you should see the data sources, thresholds, and graph definitions for this template. In the data sources section you should see 4 data points in the list. You will need to double click each of these to bring up the edit box. In the section JMX Remote Authentication Information, add the username and password of the role you created in the jmxremote.password file.

Also check the Auth Enabled checkbox. Scroll down the edit window and find the field called Raw Service URL. Paste into this the following URL, and substitute YOUR_HOSTNAME with your server’s host name and change the port numbers if needed.
service:jmx:rmi://YOUR_HOSTNAME:10002/jndi/rmi://YOUR_HOSTNAME:10001/jmxrmi
Repeat these steps for all four data sources in the screen. Next you should restart the zenjmx daemon to be sure your changes are loaded. It may be a good idea to do this after any ZenJMX configuration changes. At this point you will see four new graphs in the graph section for your device. It may take 10 – 20 minutes before you will see data appear in the new graphs If there is a configuration problem, within a few minutes there will be warning events issued. Usually these will be connection errors and you will need to verify all of the steps used in this guide.