Fedora 41 Workstation Boot Failure
When a routine `dnf update` unexpectedly left my Fedora 41 workstation unable to boot, I quickly realized I was dealing with a deeper system failure rooted in SELinux. What started as a few service errors during startup spiraled into an unbootable system unless I manually disabled SELinux via a kernel boot parameter. Like many Fedora users, I initially assumed a quick relabel or policy reinstall would resolve the issue—but as I dug deeper, it became clear that the problem was more stubborn than expected.
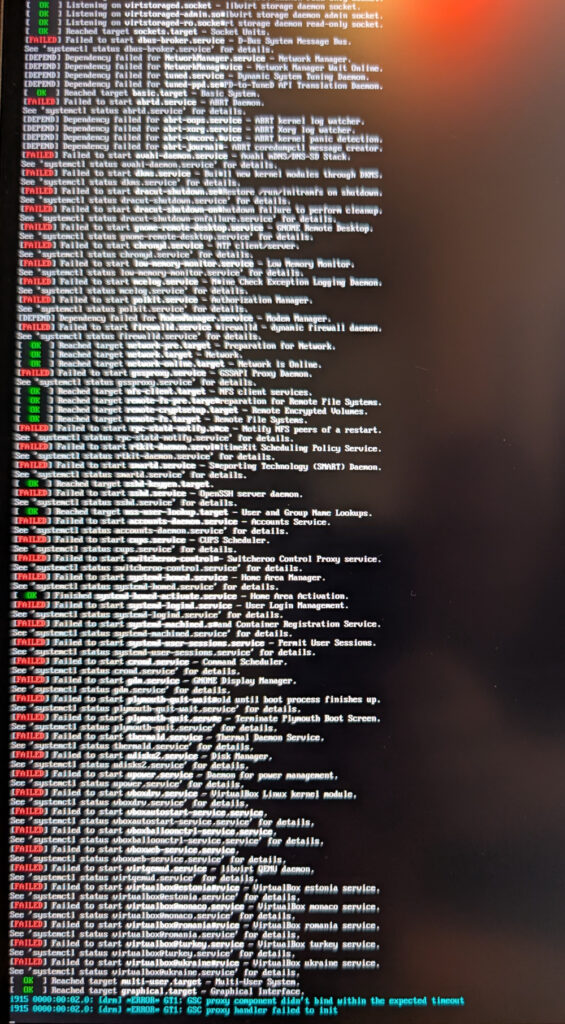
This wasn’t just a case of mislabeled files; it was a classic bootstrapping dilemma. The system needed SELinux active to run key recovery tools like `fixfiles` or `/etc/selinux/restorecond` on boot, but enabling SELinux prevented the system from reaching a usable state in the first place. It was a catch-22: SELinux couldn’t fix itself while enforcing, and permissive mode wasn’t even reachable without a functional boot. I tested various approaches, from touching `/.autorelabel` to forcing `fixfiles -F onboot`, but none of them triggered as intended during startup.
Ultimately, the solution required stepping outside the broken environment. By booting from a Fedora live USB, manually mounting my workstation’s partitions, and explicitly disabling SELinux via `grubby`, I could finally get back into the installed OS. From there, the brute-force `setfiles` command proved key: unlike the higher-level tools, it forcefully reapplied the correct SELinux contexts even under disabled enforcement. This post walks through exactly what went wrong, why the common fixes failed, and how a more aggressive manual relabel was the critical missing step to restore SELinux enforcement without breaking the boot process.
To create a Fedora Live USB drive, you can download the latest Fedora Workstation ISO from the official Fedora website and write it to a USB flash drive (4 GB or larger) using tools like Fedora Media Writer (recommended if you’re already on Fedora), Rufus (Windows), balenaEtcher, or the `dd` command (Linux/macOS). Fedora Media Writer is the official tool provided by the Fedora Project and makes it especially easy by automatically downloading the ISO and verifying it before writing. Once the USB drive is prepared, reboot your machine and enter the boot device selection menu—this usually involves pressing F4, F12, Esc, or F8 right after powering on, depending on your BIOS or motherboard. If you’re unsure, your BIOS splash screen or documentation will list the correct key. From the boot menu, select your USB device to launch the Fedora Live environment. Choose “Try Fedora” (instead of installing) to boot into a fully functional session where you can access tools like `mount`, `chroot`, and `dnf` for system recovery.
After booting the live Fedora open Terminal and run this command to see the devices for mounting.
lsblk -f
NAME        FSTYPE FSVER LABEL  UUID                                 FSAVAIL FSUSE% MOUNTPOINTS
zram0                                                                               [SWAP]
nvme0n1
nvme0n1p1 vfat   FAT32        B530-52AF                             579.4M     3% /boot/efi
nvme0n1p2 ext4   1.0          b83a914d-7818-xxxx-xxx-xxxxa  539.6M    38% /boot
nvme0n1p3 btrfs        fedora 1d02deca-c3de-xxxx-xxxx-xxxxxxx    1.6T     9% /home
Using the details from above, mount the /home and /boot partitions like this.
sudo mkdir /mnt/sysimage
sudo mount -o subvol=root /dev/nvme0n1p3 /mnt/sysimage
sudo mount /dev/nvme0n1p2 /mnt/sysimage/boot
sudo mount -B /dev /mnt/sysimage/dev
sudo mount -B /proc /mnt/sysimage/proc
sudo mount -B /sys /mnt/sysimage/sys

sudo chroot /mnt/sysimage
Now you should disable SELinux upon boot with the following command.
grubby --update-kernel ALL --args selinux=0
Exit from chroot and sudo reboot your workstation. You should now be able to boot safely into Fedora. Don’t forget to press Esc key when the Fedora boot progress appears so you can see the actual steps of the booting process. If your server did not boot, sadly the fix in this article will not work for you.
When the server boots, you should re-install SELinux packages and also relabel files with SELinux. First, re-install SELinux packages with this command.
sudo dnf reinstall selinux-policy selinux-policy-targeted policycoreutils policycoreutils-python-utils libselinux libselinux-utils
Next, you will need to brute force the relabel process. If you use fixfiles command to create a /.autorelabel this will not work because your workstation is failing to reach this part in the startup.
sudo setfiles -F -v /etc/selinux/targeted/contexts/files/file_contexts /
Now you can restore SELinux and reboot your workstation.
sudo grubby --update-kernel=ALL --remove-args="selinux=0"
sudo reboot
If for some reason the boot fails, you can follow the first steps to disable SELinux and get your workstation started.
One reply on “Fedora 41 Workstation Boot Failure”
Hacklink Panel ile SEO’da zirve ol. Sat?n alma, analiz ve yönetim i?lemlerinizi tek panelden kontrol edin. Güvenli ödeme ve detayl? raporlama ile hacklink …